There’s a particular kind of confidence that comes with buying your first welder. You’ve done the research, watched the YouTube videos, maybe even had a go at a mate’s place. So when it comes to picking up a helmet, it’s tempting to grab whatever’s cheapest and get on with it. I get it—the welder cost a few hundred quid, the consumables add up, and that £18 auto-darkening helmet on a certain well-known marketplace looks, well, fine. It’s got the right shape. It’s got a visor. Job done.
Except it really isn’t. And this is the one area where cutting corners can genuinely change your life in ways you don’t want.
Let’s talk about welding helmets properly—what they actually do, what separates a decent one from a dangerous one, and how to make a smart choice without necessarily spending a fortune.
What a Welding Helmet Is Actually Doing
Most people think the helmet is mainly about stopping sparks hitting your face. That’s part of it. But the more critical job is protecting your eyes and the skin around them from something you can’t see, feel, or smell while it’s happening: ultraviolet and infrared radiation.
The arc you’re welding with is extraordinarily bright—far brighter than looking directly at the sun—and it throws out both UV and IR radiation across a broad spectrum. Stare at it unprotected, even briefly, and you’re on course for a condition called arc eye, or photokeratitis. It feels a bit like having sand thrown in your eyes, except the sensation often doesn’t kick in until several hours later, usually around 2am when you’re trying to sleep. In its milder forms it passes. In more severe or repeated cases, the cumulative damage is permanent.
The Health and Safety Executive estimates that around 25% of all workplace eye injuries in the UK are caused by welding and cutting operations—and a significant proportion of those involve either inadequate protection or equipment that wasn’t up to standard. When you factor in amateur welders working at home without any occupational health oversight, the picture gets murkier still.
So the helmet is doing a lot more than just making you look the part.
The Lens Shade Number: The Most Important Number You’ll Encounter
Every welding lens is rated with a shade number, and understanding it is fairly straightforward once someone explains it properly. The higher the number, the darker the lens. A shade 5 is relatively light and used for gas welding or cutting. MIG and TIG welding on steel typically calls for something between shade 9 and shade 13, depending on the amperage you’re running.
The relevant standard you’ll hear referenced is EN 169, which is the European norm governing filter lenses for welding. Any helmet sold legitimately in the UK should carry a CE mark and reference this standard. If a product doesn’t mention EN 169 and can’t tell you its shade rating, that’s your first red flag.
For most beginners doing MIG welding on mild steel at home—which is the most common starting point—a shade 11 is a solid default. Push the amperage up significantly and you’d want to think about shade 12 or 13.
Auto-Darkening vs. Passive Lenses
This is where beginners often get confused, and it’s worth taking a moment with it.
A passive helmet has a fixed-shade lens. It’s always dark. You flip it down before you strike the arc, you flip it up when you stop. Simple, reliable, and cheap to make. Old-school welders swear by them, and honestly, they’re not wrong—a good passive helmet with a proper shade lens does the job.
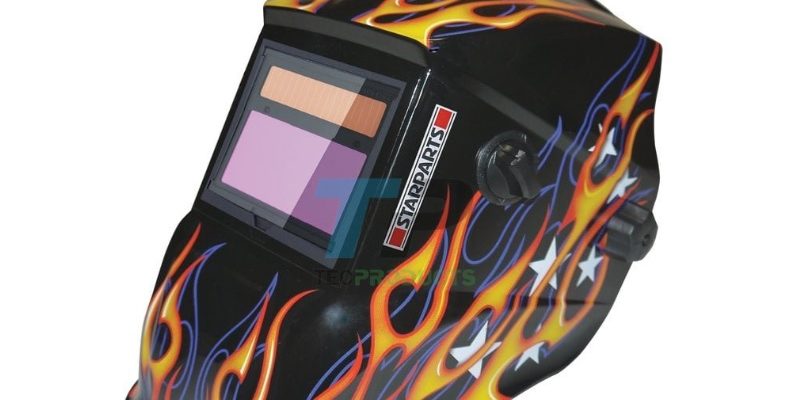
An auto-darkening helmet (ADH) has a lens that starts light (usually shade 3 or 4, enough to see what you’re doing) and darkens to your chosen shade in milliseconds when it detects the arc. For beginners, this is genuinely useful. You can position the torch properly, see exactly where you’re starting, and then weld. No more hunting for the joint after you’ve flipped the helmet down. No more pecking at the start of a bead because you’ve misjudged the position.
The switching speed is where quality really matters. A decent helmet switches in somewhere between 1/25,000th and 1/30,000th of a second. That sounds like marketing fluff, but it’s actually a meaningful difference when you’re comparing it with cheap helmets that switch in 1/2,000th of a second. The gap between those numbers represents real exposure to the arc before your eyes are protected. A fraction of a second, thousands of times over, adds up.
Solar Cells and Batteries: A Detail Worth Understanding
Auto-darkening helmets are powered either by a battery (replaceable or rechargeable), solar cells, or—in better helmets—a combination of both. Solar-assisted helmets use the light from the arc to help keep themselves charged, which extends battery life considerably and reduces the chance of the helmet failing mid-session because you forgot to charge it.
Here’s a practical thing nobody tells you: some cheap auto-darkening helmets have a delay mode that affects how long the lens stays dark after the arc stops. If that delay is too short, the lens clears while there’s still residual glow. Too long, and you’re waiting around unnecessarily. On quality helmets this is adjustable. On budget ones it’s often fixed—and fixed badly.
The Dangers of Cheap Welding Hoods (And Why This Matters More Than You Think)
Right. Let’s be direct about this.
There is a category of welding helmet—mostly sold through online marketplaces at prices that seem almost laughably low—that poses a genuine risk. Not just “you might not enjoy using it” risk. Actual eye damage risk.
A Which? investigation a few years back found that some CE-marked products sold on UK platforms didn’t meet the standards the mark implied. Counterfeit or inadequately tested CE marks are a known problem in personal protective equipment generally. The CE mark on a £15 helmet from an unfamiliar brand does not carry the same weight as one from a manufacturer who can show you test documentation.
More specifically, some cheap auto-darkening helmets have been found to:
- Have switching speeds that are dramatically slower than claimed
- Offer inadequate UV/IR filtration even in the darkened state
- Have uneven darkening across the lens, leaving blind spots of relative brightness
- Fail in cold temperatures (relevant if your workshop isn’t heated)
- Use lenses that don’t meet EN 379 standards for auto-darkening filter performance
That last one is the critical standard for ADH lenses—EN 379. It specifies optical class, switching speed, light state shade, dark state shade range, and angular dependence (how the lens performs when you’re not looking dead-on). A helmet that meets EN 379 properly has been independently tested. One that merely claims it does, without a traceable test certificate, is a gamble.
The real kicker is that arc eye from inadequate filtration isn’t always immediate or dramatic. It can be a slow accumulation of damage—slightly substandard UV protection, every session, week after week. By the time you notice something’s wrong, you’ve been building a problem for months.
What to Actually Look for When Buying
Let’s make this practical. Here’s what I’d tell a mate who was buying their first helmet.
At Sparks, we only stock helmets we actually use in our own workshop—so everything you’ll find on the site has been put through its paces by people who weld regularly, not just reviewed on a spec sheet. That makes a difference when you’re trying to figure out what’s genuinely worth your money.
Check the standards, not just the claims. Look for EN 175 (the general standard for eye and face protection in welding), EN 169 (for passive filter lenses), and EN 379 (for auto-darkening lenses). If the product listing or packaging can’t point you to these, keep looking.
Check the viewing area. A larger lens gives you a better field of view, which matters more than you’d think when you’re positioning your torch. Budget helmets often scrimp here.
Look at the shade range. A decent auto-darkening helmet will give you a variable shade range, typically 9–13. Fixed-shade auto-darkeners exist on cheaper models and are more limiting.
Consider the sensors. Better helmets use four arc sensors rather than two. This matters when you’re welding in corners or at awkward angles where one side of the helmet might be partially obscured—more sensors means more reliable detection.
Buy from a welding supplier. Firms that specialise in welding equipment have a reputation to maintain and tend to stock products they can stand behind. General online marketplaces are fine for many things, but PPE from unknown vendors is an area where provenance matters.
One More Thing Worth Saying
If you’re new to welding and you’ve bought a cheap helmet already, I’m not saying you’ve necessarily bought something dangerous—but I’d encourage you to dig into the manufacturer’s documentation and verify those standard claims. A quick email to the supplier asking for EN 379 test documentation is a perfectly reasonable thing to do.
The joy of welding—the smell, the sound, the satisfaction of a clean bead—is something worth doing for years. That means doing it in a way that keeps your eyes and face intact. A good helmet isn’t a luxury. It’s the point at which the hobby either looks after you or doesn’t.
Get the helmet right first. Everything else can be upgraded gradually.